Explore the 10 most popular Chinese Dishes that have captured the hearts and taste buds of people worldwide. From savory classics like Kung Pao Chicken and Dumplings to the irresistible flavors of Peking Duck and Sweet and Sour Pork, discover authentic dishes that showcase the rich culinary heritage of China. Perfect for food enthusiasts looking to savor traditional and modern Chinese cuisine!
1. Peking Duck Recipe
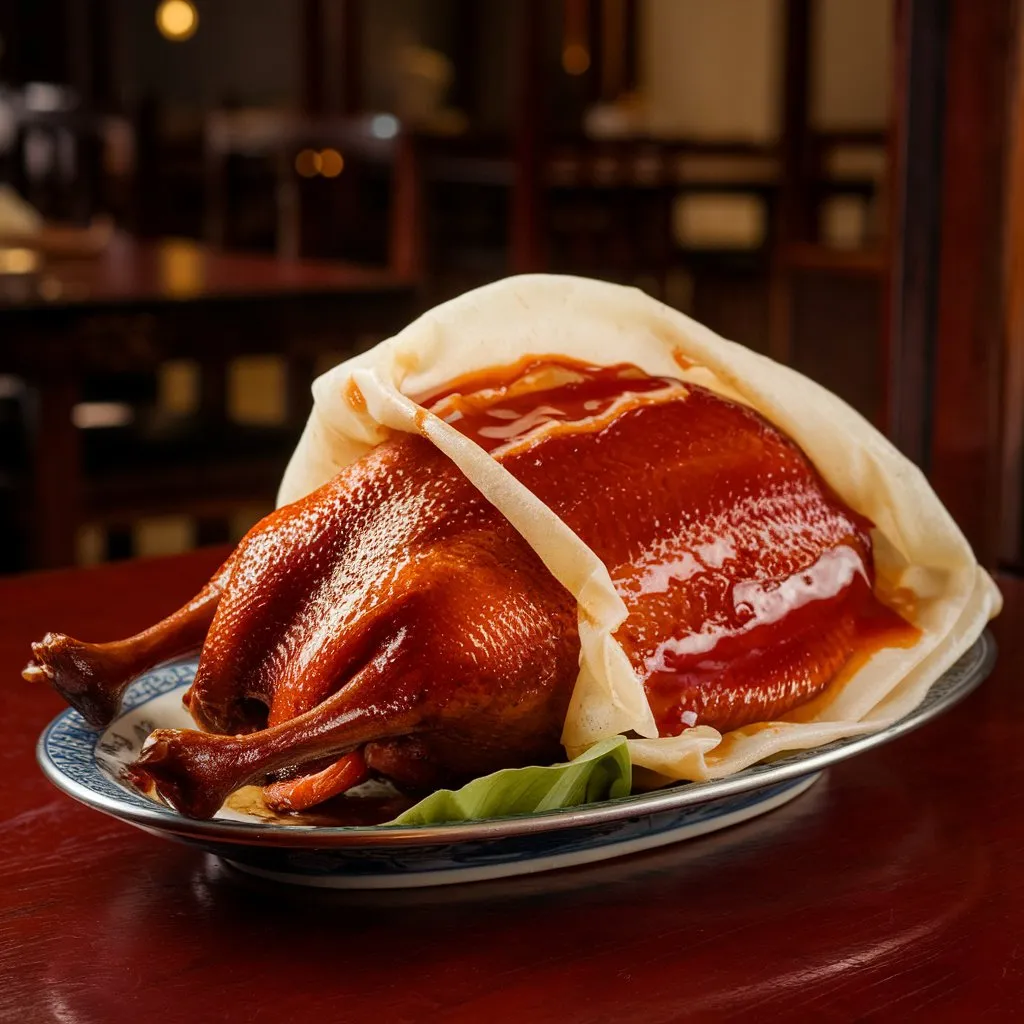
Origins of Peking Duck
Peking Duck is a renowned Chinese dish with a rich history that dates back to the Yuan Dynasty (1271–1368) when it was first introduced to the imperial courts. Initially, it was known as “shāo yāzi” (燒鴨子) and was prepared for the emperor, showcasing the culinary skills of the time. The dish gained prominence during the Ming Dynasty (1368–1644), particularly after the Yongle Emperor moved the capital from Nanjing to Beijing in 1403. This transition led to the dish being rebranded as “Beijing Roast Duck” due to its growing popularity in the new capital. The preparation of Peking Duck involves meticulous techniques that have been refined over centuries. Ducks are specially bred, often force-fed to enhance their fat content, and then prepared through a unique roasting process that achieves signature crispy skin and tender meat. The cooking methods evolved from open-fire roasting to using specialized ovens, such as the guilt, which allows for even cooking of the entire bird.
Etymology
The name “Peking Duck” derives from “Peking,” an old spelling of Beijing, which became the capital of China after Nanjing. The dish was originally referred to as “Jinling roast duck,” named after Nanjing (Jinling being an archaic name) before it was popularized in Beijing. The term reflects both its geographic origins and its association with imperial luxury.
Conclusion
Peking Duck stands as a symbol of Chinese culinary artistry and imperial heritage. Its evolution from a street food in Hangzhou to a royal delicacy in Beijing illustrates the dish’s cultural significance and its intricate preparation methods. Today, Peking Duck is celebrated worldwide, not only for its rich flavors but also for its historical roots that connect modern diners with centuries of tradition. The dish’s enduring popularity is a testament to its status as one of China’s most beloved culinary treasures, embodying both historical significance and gastronomic excellence.
Ingredients
- Duck:
- 1 whole duck (about 2.5 kg or 5.5 lbs)
- 2 teaspoons fine sea salt
- Syrup:
- Aromatic Stuffing (optional):
- For Serving:
- Peking duck pancakes (16 pieces)
- Cucumber, julienned
- Spring onions, julienned
- Hoisin sauce (about 8 tablespoons)
Instructions
- Preparation:
- Remove any excess fat from the duck and pat it dry with paper towels.
- Rub the salt all over the skin of the duck.
- Blanching:
- Bring a large pot of water to a boil. Carefully immerse the duck in boiling water for about 3 minutes to tighten the skin.
- Remove the duck and pat it dry again.
- Applying Syrup:
- In a bowl, mix maltose or honey with hot water and vinegar until well combined.
- Brush this syrup mixture evenly over the skin of the duck.
- Drying:
- Hang the duck in a cool, dry place for at least several hours or overnight to allow the skin to dry out. This step is crucial for achieving crispy skin.
- Roasting:
- Preheat your oven to 200°C (400°F). Place the duck on a rack in a roasting pan.
- Roast for about an hour, reducing the temperature to 180°C (356°F) halfway through. Cover any parts of the skin that are browning too quickly with foil.
- The duck is done when it reaches an internal temperature of at least 75°C (165°F).
- Resting:
- Once cooked, remove the duck from the oven and let it rest for about 15 minutes before carving.
- Serving:
- Slice the duck into thin pieces, ensuring that each slice has some crispy skin.
- Serve with pancakes, hoisin sauce, cucumber sticks, and spring onion slices. To eat, spread some hoisin sauce on a pancake, add slices of duck and vegetables, then wrap it up and enjoy!
This recipe captures the essence of traditional Peking Duck while being approachable for home cooks. Enjoy this delightful dish that brings a taste of Chinese culinary heritage to your table!
2. Hot Pot Recipe
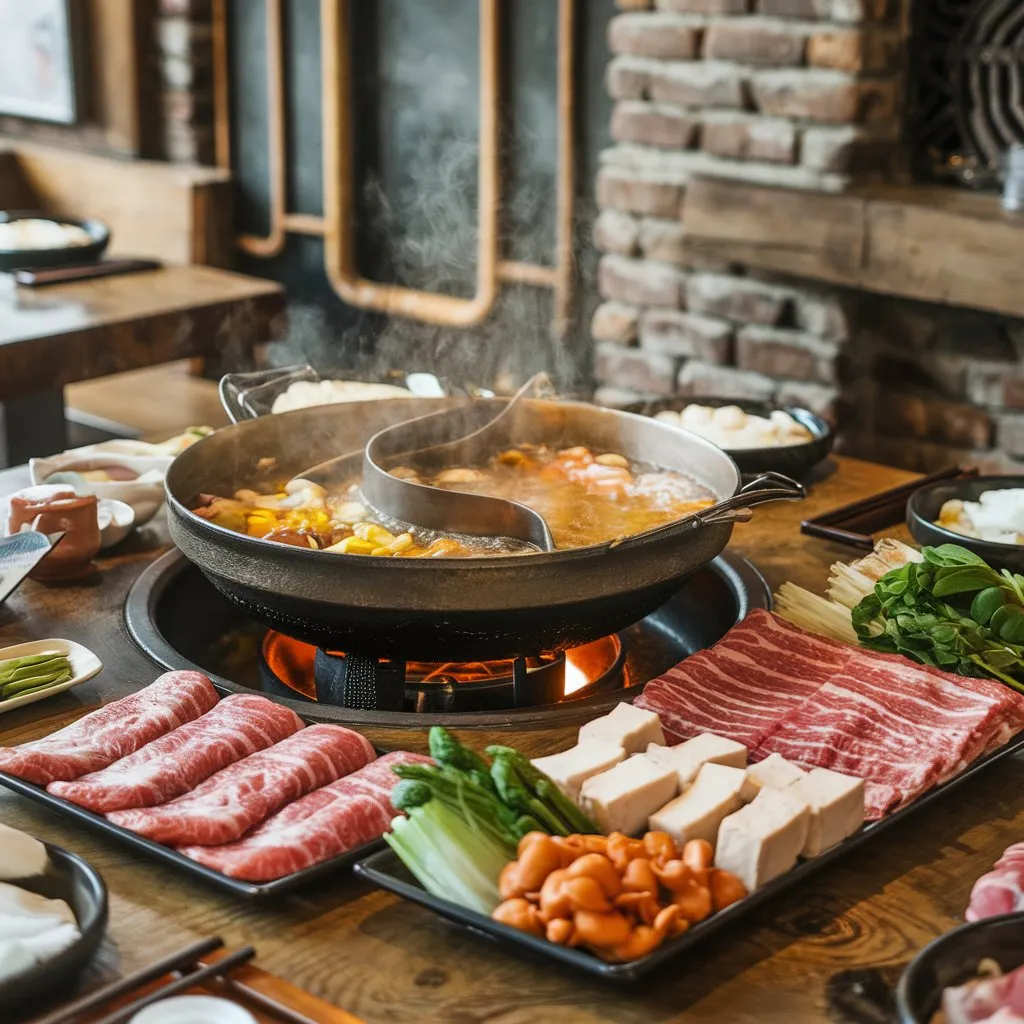
Origins of Hot Pot
Hot pot, known as huǒ guō (火锅) in Chinese, has a rich history that dates back over 1,000 years, with some sources tracing its roots even further to the Shang and Zhou dynasties (approximately 1600-256 BC). The earliest forms of hot pot are believed to have emerged during these periods, primarily as communal cooking methods. One prevalent theory suggests that the dish evolved from the nomadic cooking practices of Mongolian horsemen, who used their helmets to simmer broth over open fires, cooking meat and vegetables in the process. The Three Kingdoms period (220-280 AD) marks a significant evolution in hot pot’s history, as this era saw the introduction of copper pots, which became synonymous with the dish. During this time, hot pots began to gain popularity in northern China, especially during colder months when warm meals were particularly desirable. The dish further evolved through the Ming (1368-1644) and Qing dynasties (1644-1912), where it was enjoyed by emperors and adapted to regional tastes as it spread throughout China.
Etymology
The term “hot pot” directly refers to the method of cooking where ingredients are immersed in boiling broth. The Chinese characters 火锅 translate to “fire pot,” emphasizing the communal aspect of cooking food at the table. The dish’s name reflects both its preparation style and its cultural significance in fostering social interaction among diners.
Conclusion
Hot pot is more than just a meal; it embodies centuries of culinary tradition and social bonding. Its origins in Mongolian nomadic practices and subsequent evolution through various Chinese dynasties highlight its adaptability and enduring appeal. Today, hot pot is celebrated worldwide for its communal dining experience, allowing diners to customize their meals with a variety of ingredients and broths. This dish not only represents a unique culinary heritage but also continues to evolve, reflecting contemporary tastes and dining trends across cultures.
Ingredients
For the Broth:
- Spicy Broth:
- 50 g dried chilies (about 2 cups)
- 3 tablespoons Sichuan pepper
- 2 tablespoons Shaoxing rice wine
- 110 g neutral cooking oil (about ½ cup)
- 350 g beef tallow (or substitute with another fat)
- 2-star anise
- 4 small pieces of cassia cinnamon
- 4 bay leaves
- 1 onion, sliced
- 5 stalks of scallions, cut into sections
- 1 head of garlic, minced
- Water or stock to fill the pot
- Mild Broth:
- 8 cups chicken broth or water
- 5 slices ginger
- 5 dried shiitake mushrooms, rehydrated
- Optional: Goji berries, dried Chinese dates
For the Ingredients:
- Proteins:
- Thinly sliced meats (beef rib eye, lamb shoulder, pork belly)
- Assorted seafood (shrimp, fish balls, scallops)
- Frozen dumplings or wontons
- Vegetables:
- Napa cabbage
- Bok choy
- Enoki mushrooms
- Shiitake mushrooms
- Lotus root slices
- Corn on the cob
- Carbs:
- Handmade noodles (udon, glass noodles)
- Cooked rice
For Hot Pot Sauce:
- Soy sauce (¼ cup)
- Sesame paste or tahini (2 tablespoons)
- Minced garlic (1 tablespoon)
- Chopped green onions (to taste)
- Chili oil or fresh sliced chili (to taste)
Instructions
- Prepare the Broth:
- For the spicy broth, heat the neutral oil in a large pot over medium heat. Add Sichuan pepper and dried chilies, stirring until fragrant.
- Add Shaoxing rice wine, onion, garlic, star anise, cassia cinnamon, bay leaves, and any additional spices. Pour in enough water or stock to fill the pot and bring it to a simmer.
- For the mild broth, combine chicken broth with ginger and shiitake mushrooms in another pot and bring to a simmer.
- Prepare Ingredients:
- Arrange all proteins, vegetables, and carbs on large platters for easy access during cooking. Ensure meats are thinly sliced for quick cooking.
- Make Hot Pot Sauce:
- In a small bowl, mix soy sauce, sesame paste, minced garlic, and chili oil. Adjust ingredients based on personal taste preferences.
- Cooking at the Table:
- Place your simmering broth in the center of the table on a portable burner.
- Diners can add their choice of proteins and vegetables into the broth using chopsticks or small ladles. Cook until the ingredients are done (usually just a few minutes for thin slices of meat).
- Serve cooked items with hot pot sauce for dipping.
- Enjoy!
- Continue adding ingredients to the broth as desired and enjoy the communal experience of hot pot dining.
This hot pot recipe allows for flexibility in ingredients based on personal preferences and dietary restrictions. It’s perfect for gatherings where everyone can customize their meal!
3. Chinese Dishes: Mapo Tofu Recipe
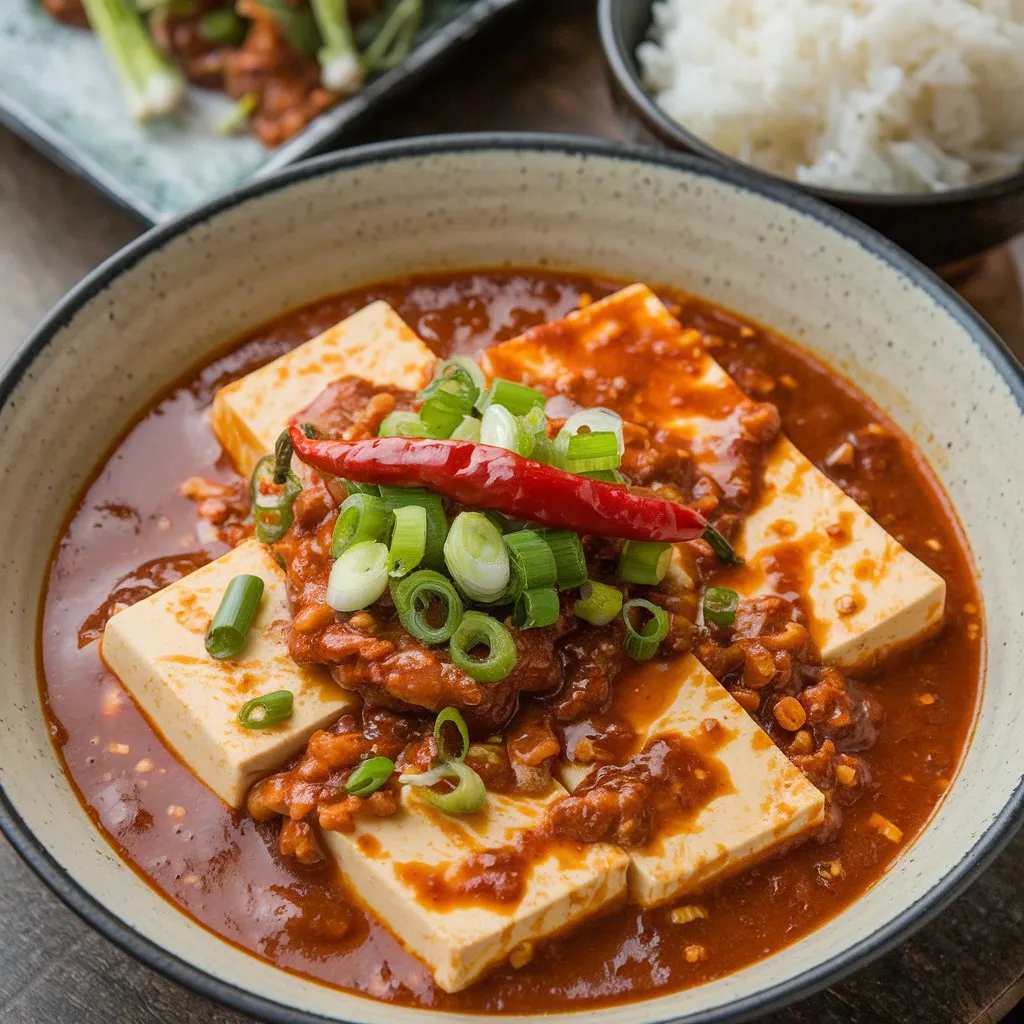
Origins of Mapo Tofu
Mapo Tofu is a beloved dish originating from Chengdu, the capital of Sichuan province in China. Its roots can be traced back to the late 19th century, specifically around the 1860s, when it was popularized by a woman named Chen Ma Po, who ran a small restaurant. The dish is characterized by its spicy and numbing flavors, achieved through the use of Sichuan peppercorns and doubanjiang (fermented broad bean and chili paste) combined with soft tofu and minced meat, traditionally beef. The dish’s history is steeped in local lore, with various accounts suggesting that it may have existed even earlier, possibly as far back as 1254. However, it was Mrs. Chen’s restaurant that truly put Mapo Tofu on the culinary map. Her unique preparation method and the dish’s vibrant flavors quickly gained popularity among laborers and locals, establishing it as a staple in Sichuan cuisine.
Etymology
The name “Mapo Tofu” (麻婆豆腐) translates literally to “pockmarked old woman’s tofu.” The character “ma” (麻) refers to pockmarks, while “po” (婆) denotes an older woman or grandmother. This nomenclature directly references Mrs. Chen, who was said to have smallpox scars on her face. The name reflects both her identity and the dish’s origins, often described humorously yet affectionately in Chinese culture.
Conclusion
Mapo Tofu is more than just a dish; it represents a rich tapestry of history and culture from Sichuan province. Its journey from humble beginnings in a small restaurant to becoming a globally recognized culinary icon illustrates the power of food to transcend boundaries and bring people together. Today, Mapo Tofu remains a quintessential part of Sichuan cuisine, celebrated for its bold flavors and unique character. The legacy of Mrs. Chen endures as chefs around the world continue to reinterpret this classic dish, ensuring that its spicy allure captivates new generations of food lovers everywhere.
Ingredients
- Tofu:
- 380 g (13.4 oz) soft or silken tofu
- Meat:
- 100 g (3.5 oz) ground pork (or beef)
- Aromatics and Seasonings:
- 1 tbsp Sichuan peppercorns
- 2 tbsp doubanjiang (Sichuan chili bean paste)
- 3 cloves garlic, finely chopped
- 1 tbsp ginger, minced
- 1 tsp chili powder (adjust to taste)
- Liquids:
- 1 cup chicken stock
- 1 tbsp soy sauce
- 1 tsp dark soy sauce
- 1 tsp sugar
- 1 tsp vinegar
- Thickening Agent:
- 2 tsp cornstarch mixed with 2 tsp water
- Finishing Touches:
- 1 tsp sesame oil
- 2 tbsp finely sliced spring onions (scallions)
- For Serving:
Instructions
- Prepare the Tofu:
- Drain the tofu and cut it into bite-sized cubes. To firm it up, bring a pot of water to a gentle simmer, add a pinch of salt, and carefully add the tofu cubes. Simmer for about 2-3 minutes, then turn off the heat and let the tofu steep in the hot water.
- Toast the Sichuan Peppercorns:
- In a dry frying pan over medium-high heat, toast the Sichuan peppercorns until they start to smoke. Remove from heat and grind them into a fine powder using a mortar and pestle or spice grinder.
- Cook the Meat:
- In a wok or large frying pan, heat about 4 tablespoons of vegetable oil over high heat. Add the ground pork and cook until browned, breaking it apart as it cooks for about 2-3 minutes.
- Add Aromatics:
- Stir in the doubanjiang, garlic, ginger, and chili powder. Cook for another minute until fragrant.
- Combine with Liquids:
- Pour in the chicken stock, soy sauce, dark soy sauce, sugar, and vinegar. Bring to a simmer and reduce the heat to medium. Let it cook for about 3-4 minutes until slightly thickened.
- Thicken the Sauce:
- Stir in the cornstarch mixture to thicken the sauce further. Then add the ground Sichuan peppercorns to enhance the flavor.
- Add Tofu:
- Carefully drain the tofu and add it to the wok. Gently toss to coat the tofu with the sauce without breaking it apart.
- Finish and Serve:
- Drizzle with sesame oil and sprinkle with spring onions before serving. Enjoy hot with steamed rice.
This Mapo Tofu recipe captures the essence of traditional Sichuan cuisine while being easy to prepare at home. Adjust spice levels according to your preference for an enjoyable dining experience!
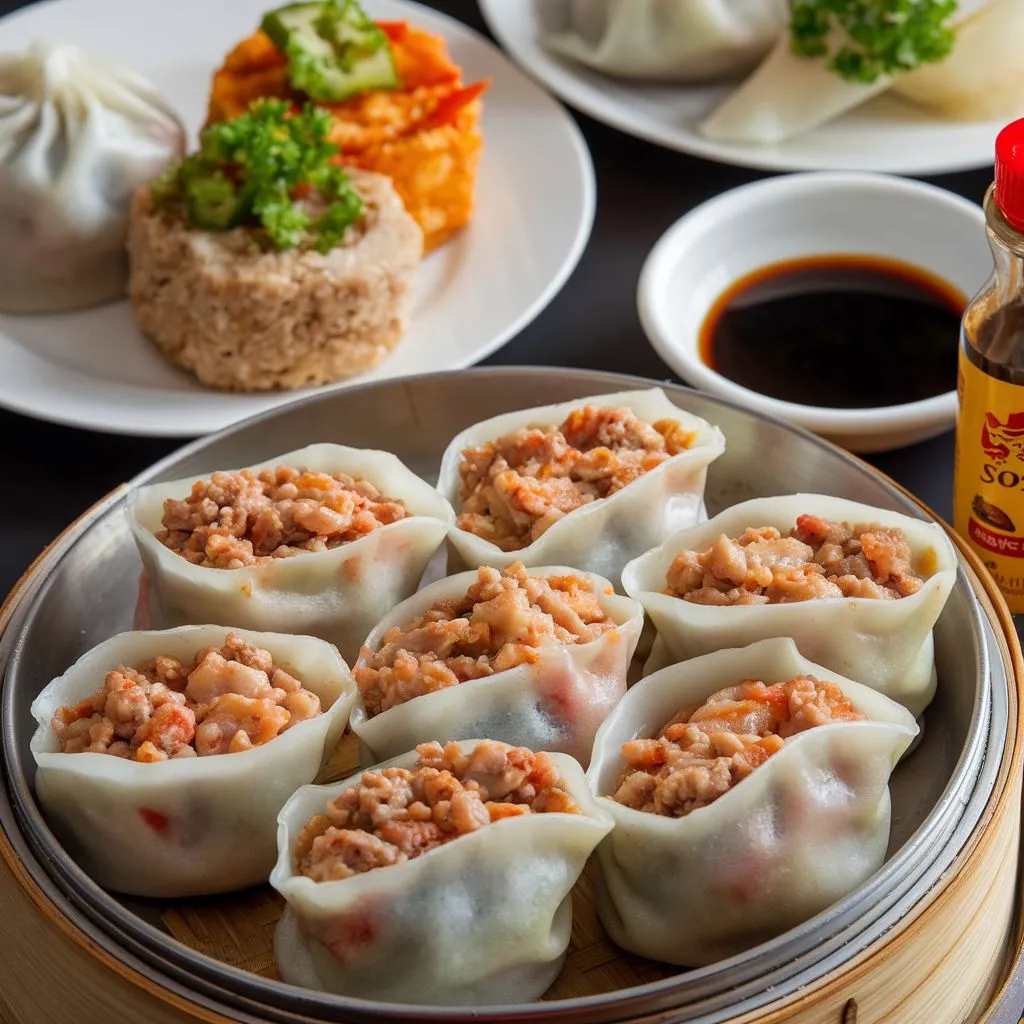
4. Dim Sum Recipe
Origins of Dim Sum
Dim sum has its roots in the teahouses of ancient China, particularly during the Jin Dynasty (265-420 AD). Initially, these teahouses served as rest stops for travelers along the Silk Road, offering tea and simple snacks. Over time, they evolved into social gathering places where people could enjoy a variety of small dishes alongside their tea. This practice of serving small bites became known as yum cha, which translates to “drink tea,” and is integral to the dim sum experience. The popularity of dim sum grew significantly during the Tang Dynasty (618-907 AD) and later flourished in the Song Dynasty (960-1279 AD). It became a staple in the imperial courts, showcasing the culinary skills of chefs and evolving into an elaborate dining tradition. By the Ming (1368-1644) and Qing dynasties (1644-1912), dim sum had spread from rural areas to bustling urban centers, particularly in Guangdong province, where Cantonese cuisine refined this culinary art.
Etymology
The term “dim sum” (點心) means “touch the heart” in Cantonese. The phrase reflects the idea that these small dishes are meant to be shared and enjoyed together, fostering social connections. The origins of the name are somewhat contested; one legend suggests it arose from a general who sent food to soldiers as a gesture of gratitude, which later became associated with small bites served with tea. The concept emphasizes both the culinary and emotional aspects of sharing food with loved ones.
Conclusion
Dim sum is not merely a meal; it represents a rich cultural tradition that has evolved over centuries. From its humble beginnings in ancient teahouses to its status as a global culinary phenomenon, dim sum embodies community, sharing, and hospitality. Today, it is celebrated worldwide, enjoyed in various forms and flavors that reflect both traditional practices and modern innovations. The experience of enjoying dim sum—gathering around a table filled with an array of delicious small dishes—continues to strengthen bonds among family and friends, making it a cherished part of Chinese dining culture.
Ingredients
- For the Filling:
- 300 g (10.5 oz) ground pork
- 300 g (10.5 oz) raw shrimp, peeled and deveined
- 2 tablespoons soy sauce
- 1 tablespoon oyster sauce
- 1 teaspoon sesame oil
- 1 teaspoon sugar
- 1 teaspoon salt
- 2 green onions, finely chopped
- 1 tablespoon ginger, minced
- 20-24 wonton wrappers (or shumai wrappers)
- For Steaming:
- Water for steaming
- Chinese cabbage leaves or parchment paper (to line the steamer)
- For Dipping Sauce (optional):
- Soy sauce
- Chilli oil or vinegar
Instructions
- Prepare the Filling:
- In a food processor, combine the shrimp and pulse until coarsely chopped.
- In a large bowl, mix the ground pork, chopped shrimp, soy sauce, oyster sauce, sesame oil, sugar, salt, green onions, and ginger until well combined.
- Assemble the Shumai:
- Take a wonton wrapper and place about a tablespoon of filling in the center.
- Gently gather the edges of the wrapper around the filling to create an open-top dumpling shape. Pinch to secure but leave the top exposed.
- Prepare for Steaming:
- Line a bamboo steamer with Chinese cabbage leaves or parchment paper to prevent sticking.
- Place the shumai in the steamer basket, ensuring they are not touching each other to allow for even cooking.
- Steam the Shumai:
- Fill a pot or wok with water and bring it to a boil.
- Place the bamboo steamer over the boiling water, cover it with a lid, and steam for about 12-15 minutes until cooked through.
- Serve:
- Carefully remove the shumai from the steamer and serve hot with soy sauce and chili oil for dipping.
This recipe captures the essence of traditional dim sum while being approachable for home cooks. Enjoy your homemade shumai as part of a larger dim sum spread or as a delicious snack!
5. Soup Dumplings Recipe
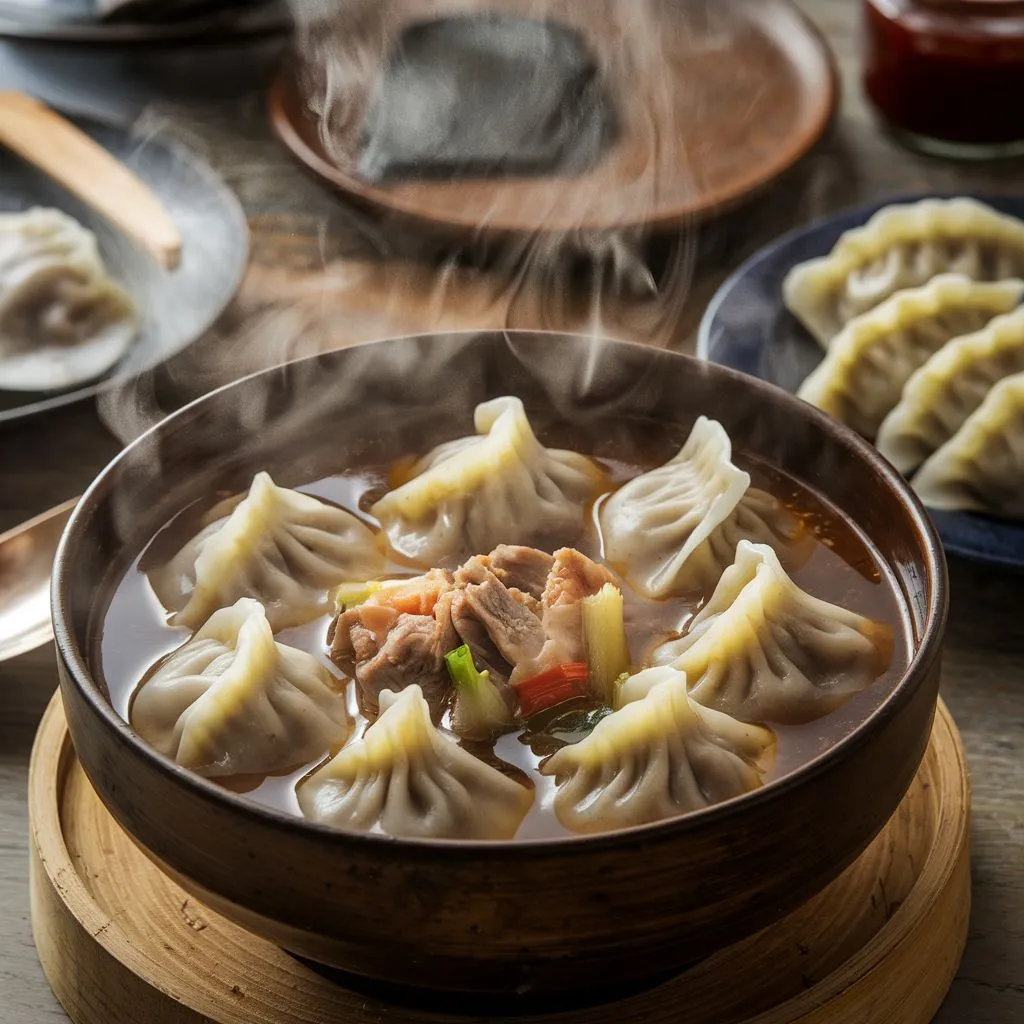
Origins of Soup Dumplings
Soup dumplings, commonly known as xiao long bao, originated in the 1870s in Nanxiang, a town on the outskirts of Shanghai. The creation is attributed to Huang Mingxian, who owned a restaurant called Ri Hua Xuan. To stand out from competitors, he innovatively added aspic—a jellied meat stock—into dumplings filled with minced pork. When steamed, the aspic melted, creating a flavorful soup inside the dumpling. This method not only delighted diners but also marked the beginning of what would become a beloved dish in Chinese cuisine and beyond. The popularity of xiao long bao grew rapidly, transforming from a local delicacy into a staple found in dim sum restaurants worldwide. The dumpling’s unique combination of a delicate wrapper and savory broth has captivated food lovers, contributing to its status as one of China’s most iconic culinary exports.
Etymology
The term “xiao long bao” (小笼包) translates to “small basket bun” in Mandarin. The word “xiao” (小) means small, “long” (笼) refers to the bamboo steamer basket in which the dumplings are traditionally cooked, and “bao” (包) means bun or dumpling. This name reflects both its size and the method of cooking. The dish is often simply referred to as “soup dumpling” in English-speaking contexts, emphasizing its most distinctive feature: the soup within.
Conclusion
Soup dumplings represent a remarkable fusion of culinary creativity and tradition. From their humble beginnings in a small Nanxiang restaurant to their global acclaim, Xiao Long Bao illustrates how food can evolve and adapt while retaining its cultural significance. Today, they are not only a staple in Chinese cuisine but also an emblem of culinary artistry that continues to inspire chefs and delight diners around the world. The enduring popularity of soup dumplings speaks to their unique appeal, offering a delicious experience that combines texture, flavor, and the joy of sharing food with others.
Ingredients
For the Gelatinized Soup:
- 240 ml (1 cup) chicken or pork broth
- 1 tsp gelatin powder (or use homemade aspic)
For the Filling:
- 450 g (1 lb) ground pork (preferably with some fat)
- 1 tbsp Shaoxing wine (or dry sherry)
- 1 tbsp soy sauce
- 1 tbsp sesame oil
- 1 tsp grated ginger
- 1 tsp sugar
- 1 tsp salt
- ¼ tsp ground white pepper
For the Wrapper:
- 200 g (1.5 cups) all-purpose flour, plus more for dusting
- ½ tsp salt
- 110 g (about ½ cup) hot boiling water
For Steaming:
- Parchment paper or cabbage leaves (to line the steamer)
Instructions
- Prepare the Gelatinized Soup:
- Heat the broth until warm, then dissolve the gelatin powder in it. Pour into a shallow dish and refrigerate until set, about 4 hours or overnight. Once set, cut into small cubes.
- Make the Dough for the Wrappers:
- In a bowl, combine flour and salt. Gradually add hot water while stirring with chopsticks or a fork until it forms a shaggy dough.
- Knead the dough on a floured surface for about 5 minutes until smooth and elastic. Cover with a damp cloth and let it rest for at least 30 minutes.
- Prepare the Filling:
- In a large bowl, combine ground pork, Shaoxing wine, soy sauce, sesame oil, ginger, sugar, salt, and white pepper. Mix well until combined.
- Gently fold in the cubed gelatinized soup until evenly distributed.
- Roll Out the Wrappers:
- Divide the rested dough into small pieces (about 20). Roll each piece into a ball.
- Using a rolling pin, flatten each ball into a thin round wrapper (about 3 inches in diameter). Aim for thinner edges and a slightly thicker center.
- Assemble the Dumplings:
- Place about 1 tablespoon of filling in the center of each wrapper.
- Gather the edges of the wrapper and pleat them around the filling, pinching to seal at the top. Aim for about 10-12 pleats per dumpling.
- Prepare to Steam:
- Line your steamer basket with parchment paper or cabbage leaves to prevent sticking.
- Place the dumplings in the steamer, ensuring they are not touching each other.
- Steam the Dumplings:
- Bring water to a boil in a pot or wok. Place the steamer over it and steam for about 8-10 minutes until cooked through.
- Serve:
- Carefully remove the dumplings from the steamer. Serve hot with dipping sauce made from black vinegar and sliced ginger.
Tips:
- Practice pleating to achieve beautiful dumplings; this may take some time!
- Ensure your steamer is preheated to maintain steam during cooking.
- Enjoy your soup dumplings by taking a small bite to slurp out the broth before consuming it!
This recipe captures the essence of traditional xiao long bao while being approachable for home cooks. Enjoy your culinary adventure!
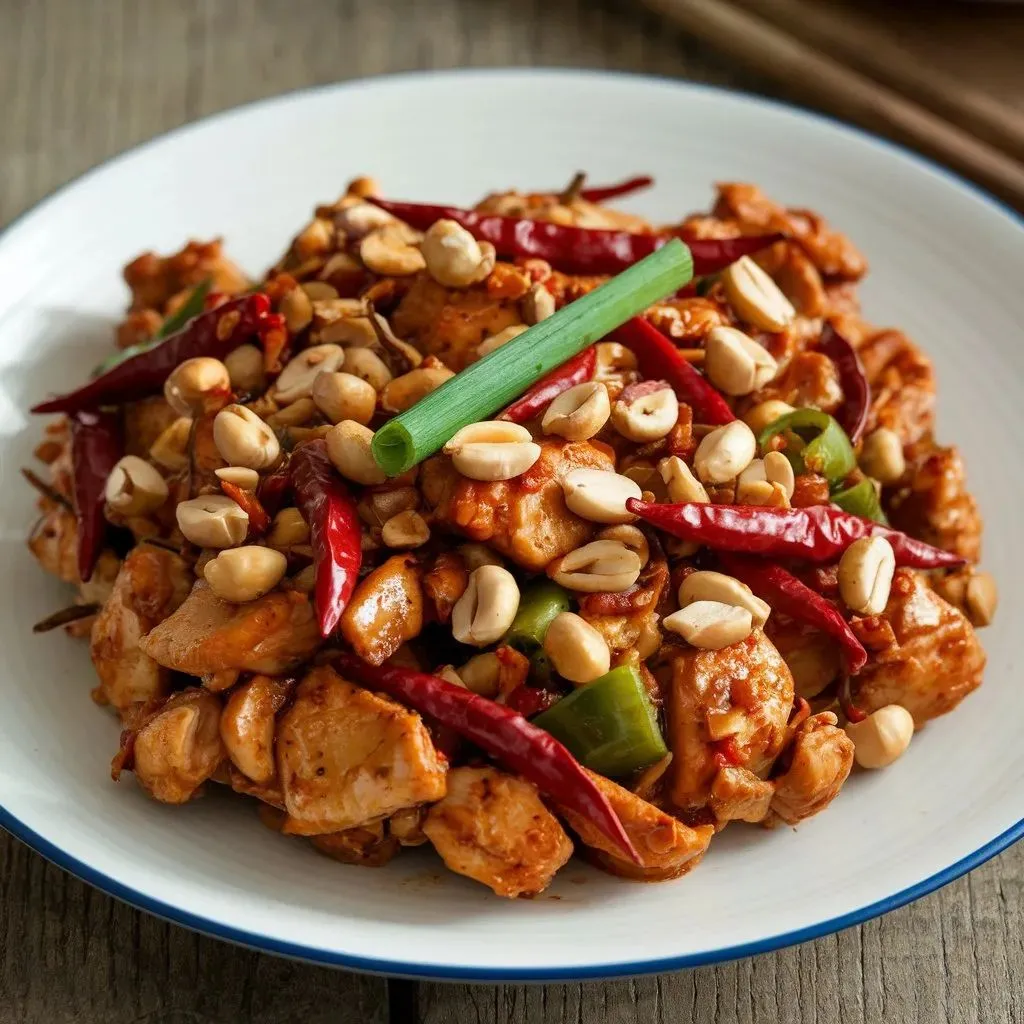
6. Kung Pao Chicken Recipe
Origins and Etymology of Kung Pao Chicken
Kung Pao Chicken, known in Chinese as 宫保鸡丁 (pinyin: gōngbǎo jīdīng), is a renowned dish originating from Sichuan Province, China. The name “Kung Pao” is derived from the title Gongbao, which translates to “Palace Guardian.” This title was held by Ding Baozhen (1820–1886), a Qing Dynasty official and governor of Sichuan. The dish is believed to have been named in his honor due to his fondness for it and his influence in popularizing it within the region. The etymology can be broken down as follows:
- 宫 (gōng): palace
- 保 (bǎo): to protect or safeguard
- 鸡 (jī): chicken
- 丁 (dīng): cubed or diced
Thus, the literal translation of Kung Pao Chicken is “palace guardian diced chicken,” reflecting both its royal associations and its preparation style. Kung Pao Chicken’s origins are somewhat legendary. One popular story recounts that Ding Baozhen, after being saved from drowning as a child, was served a dish featuring diced chicken, peanuts, and spicy peppers by the family that rescued him. He enjoyed it so much that he began serving it to guests, leading to its spread and eventual naming.
Conclusion
Kung Pao Chicken has evolved from its historical roots into a staple of both authentic Sichuan cuisine and Westernized Chinese food. While the original Sichuan version emphasizes the use of Sichuan peppercorns for their unique numbing flavor, Western adaptations often modify the ingredients and preparation methods to suit local tastes. Despite these variations, Kung Pao Chicken remains a beloved dish worldwide, celebrated for its bold flavors and rich history linked to a significant figure in Chinese history.
Ingredients
For the Chicken Marinade
- 24 oz boneless skinless chicken breast, cut into bite-sized pieces
- 2 tbsp cornstarch
- 4 tbsp low sodium soy sauce
- 2 tbsp dry sherry or Chinese Shaoxing wine
- 2 tsp oil
For the Kung Pao Sauce
- 1/4 cup low-sodium soy sauce
- 2 tsp dark soy sauce
- 1/2 cup low-sodium chicken broth
- 2 tbsp Chinese black vinegar or balsamic vinegar
- 2 tbsp dry sherry or Chinese Shaoxing wine
- 2 tsp hoisin sauce
- 1 tbsp sugar
- 1 tsp cornstarch
Additional Ingredients
- 1 cup raw peanuts (or roasted peanuts)
- 2 tbsp cooking oil (for stir-frying)
- 3 cloves garlic, minced
- 1 inch ginger, grated
- 1 bell pepper, diced (optional)
- Dried red chilies (to taste)
- Green onions, chopped (for garnish)
- Sesame seeds (for garnish)
Instructions
- Marinate the Chicken:
- In a bowl, combine the chicken with cornstarch, soy sauce, dry sherry, and oil. Mix well and let it marinate for at least 10 minutes.
- Prepare the Kung Pao Sauce:
- In another bowl, whisk together all the sauce ingredients until smooth and the cornstarch is dissolved. Set aside.
- Roast the Peanuts:
- Heat a teaspoon of oil in a wok or large skillet over medium heat. Add raw peanuts and stir continuously for about 3 minutes until they are fragrant and slightly golden. Remove from heat and let cool.
- Stir-Fry the Chicken:
- In the same wok or skillet, heat 2 tablespoons of oil over high heat. Add the marinated chicken and stir-fry until golden brown and nearly cooked through (about 3–4 minutes). Remove from the pan and set aside.
- Cook Vegetables:
- In the same pan, add more oil if needed. Add minced garlic, grated ginger, diced bell pepper, dried chilies, and Sichuan peppercorns (if using). Stir-fry for about 1–2 minutes until fragrant.
- Combine Everything:
- Return the chicken to the pan and pour in the prepared Kung Pao sauce. Stir well to coat everything as the sauce thickens (about 1–2 minutes).
- Finish with Peanuts:
- Add roasted peanuts and chopped green onions to the mixture. Stir to combine all ingredients.
- Serve:
- Garnish with sesame seeds if desired and serve hot over steamed rice.
This recipe captures the essence of Kung Pao Chicken with its balance of sweet, savory, and spicy flavors, making it a delightful dish for any occasion!
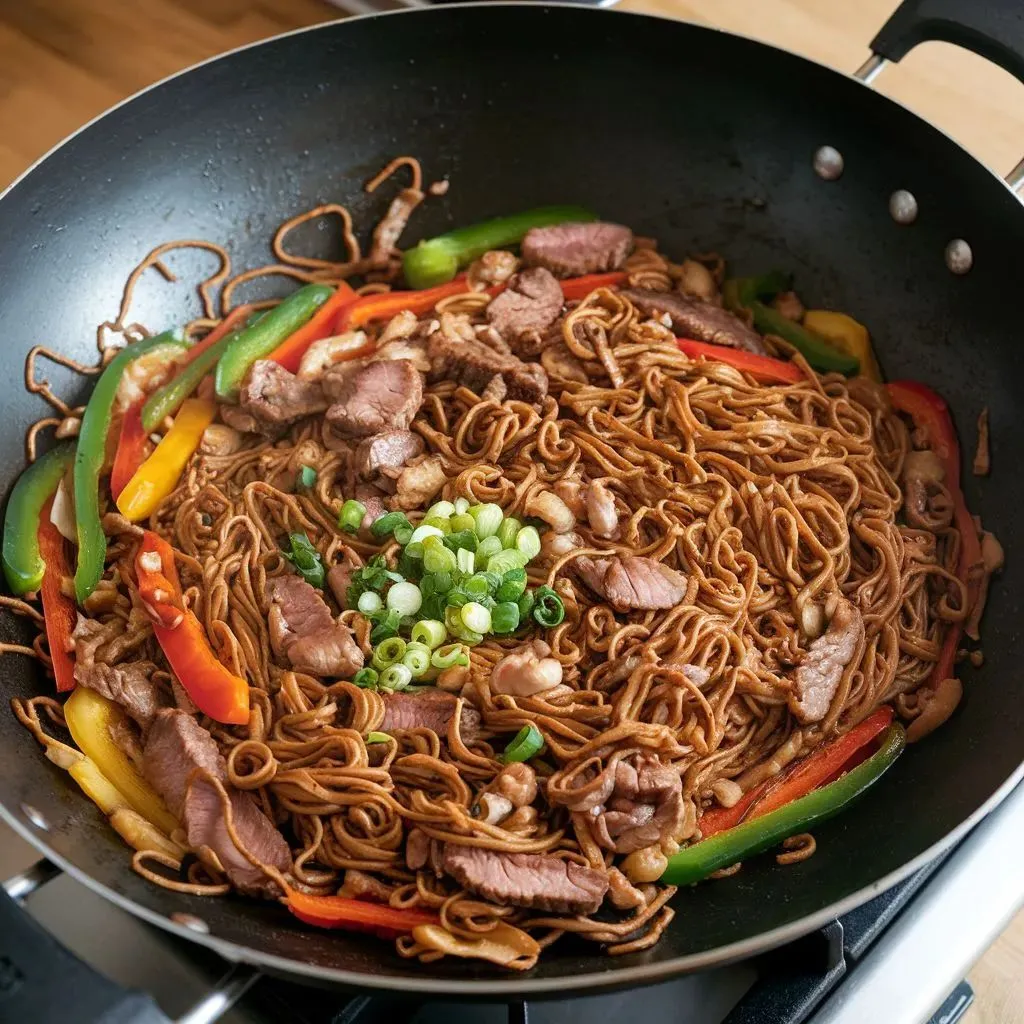
7. Chow Mein Recipe
Origins and Etymology of Chow Mein
Chow Mein, a popular dish in Chinese cuisine, derives its name from the Taishanese dialect of Cantonese, where “chow” (炒) means “to stir-fry” and “mein” (麵) means “noodles.” Therefore, Chow Mein translates literally to “stir-fried noodles”. The roots of this dish can be traced back over 2,000 years to ancient China, where wheat noodles became a dietary staple during the Han Dynasty (206 BCE – 220 CE). The dish began to take its modern form during the 19th and early 20th centuries, coinciding with significant Chinese immigration to the United States. Immigrants from the Taishan region adapted their traditional recipes to suit local ingredients and tastes, leading to the emergence of unique variations of Chow Mein within Chinese-American cuisine. Chow Mein is characterized by two primary styles: crispy and soft. The crispy version involves frying the noodles until they are golden brown, serving as a base for various toppings, while the soft version is briefly stir-fried, resulting in tender noodles served with sauce and vegetables. The popularity of Chow Mein surged in American restaurants, becoming emblematic of Chinese-American culinary traditions and adapting further as it spread globally.
Conclusion
Chow Mein is more than just a dish; it represents a fusion of cultures and culinary practices. Its journey from ancient Chinese noodles to a beloved staple in various cuisines worldwide illustrates the adaptability and evolution of food. As it continues to be enjoyed across different cultures, Chow Mein encapsulates a rich history that reflects the experiences of Chinese immigrants and their influence on global culinary landscapes. Whether served crispy or soft, Chow Mein remains a testament to the enduring legacy of Chinese cuisine.
Ingredients
For the Chow Mein
- 300g (11 oz) chow mein noodles (or Hong Kong-style pan-fried noodles)
- 1/2 small cabbage, thinly sliced
- 2 carrots, julienned
- 5 green onions, sliced (white and green parts separated)
- 3 cloves garlic, minced
- 1 tablespoon ginger, grated
- 4 tablespoons oil (for stir-frying)
- Optional: 1 cup bean sprouts
For the Sauce
- 1/4 cup oyster sauce
- 1 tablespoon light soy sauce
- 1 tablespoon dark soy sauce
- 1 teaspoon sugar
- 2 tablespoons water
- Optional: Sriracha or chili sauce for heat
Instructions
- Prepare the Noodles:
- Boil water in a pot and cook the chow mein noodles for about 2 minutes less than package instructions. Drain and rinse under cold water to stop the cooking process. Toss with a little oil to prevent sticking.
- Make the Sauce:
- In a small bowl, whisk together oyster sauce, light soy sauce, dark soy sauce, sugar, and water. Set aside.
- Stir-Fry the Vegetables:
- Heat a wok or large skillet over high heat and add 2 tablespoons of oil. Add the carrots and stir-fry for about 1 minute.
- Add the sliced cabbage and the white parts of the green onions. Stir-fry for another minute until vegetables are slightly tender but still crisp.
- Add minced garlic and grated ginger; stir-fry for an additional 30 seconds until fragrant. Remove the vegetables from the pan and set aside.
- Cook the Noodles:
- In the same pan, add another tablespoon of oil and add the cooked noodles. Stir-fry for about 2–3 minutes until they are heated through and starting to get a bit crispy.
- Combine Everything:
- Return the cooked vegetables to the pan with the noodles. Pour in the prepared sauce and toss everything together for about 2 minutes until well combined and heated through.
- Serve:
- Garnish with the green parts of the green onions and serve hot. Optionally, you can add bean sprouts for extra crunch.
This Chow Mein recipe is versatile, allowing you to customize it with your favorite proteins or additional vegetables as desired! Enjoy your homemade Chow Mein!
8. Spring Rolls Recipe
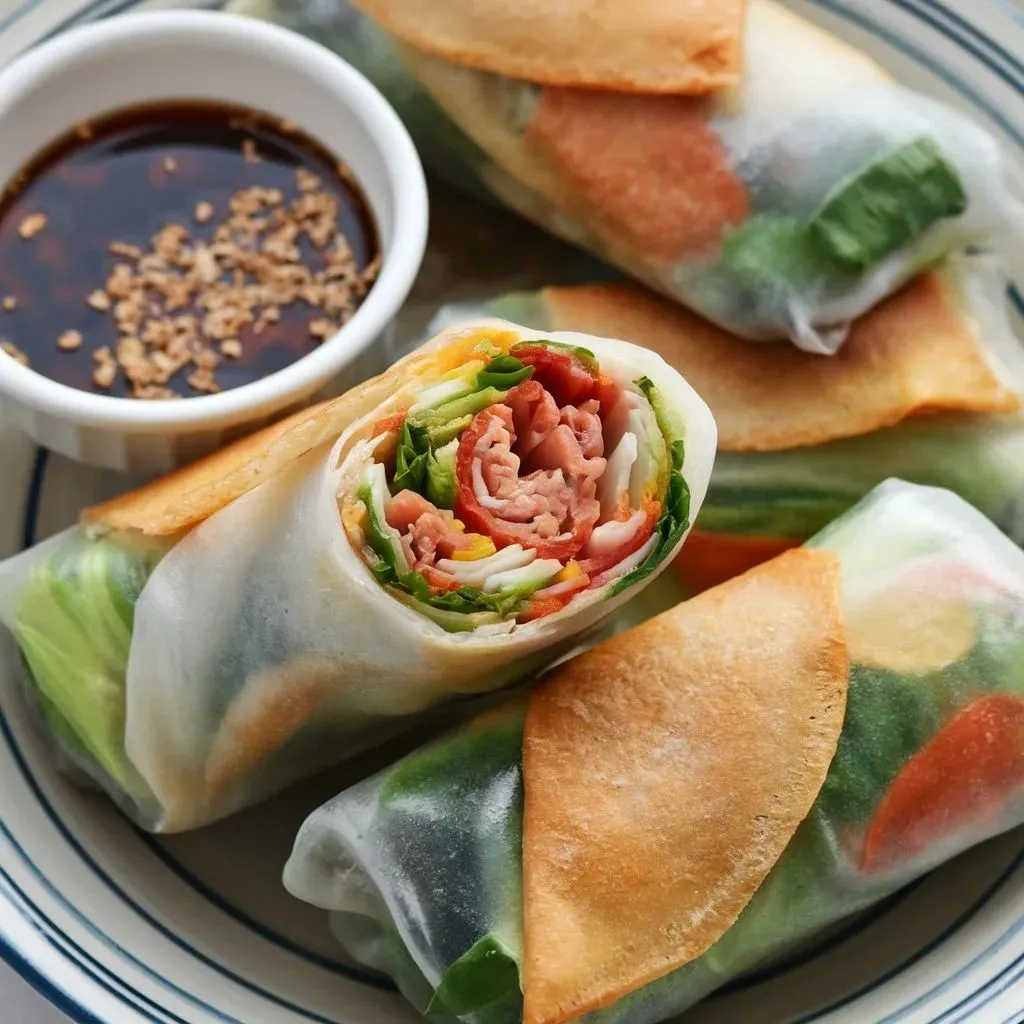
Origins and Etymology of Spring Rolls
Spring rolls are a popular dish that originated in China, with a history dating back to the Eastern Jin Dynasty (265–420 AD). Initially, these rolls were thin pancakes filled with seasonal vegetables, made to celebrate the arrival of spring. The name “spring roll” is derived from the Chinese term 春卷 (chūnjuǎn), which translates literally to “spring roll,” reflecting their association with the spring season and the Lunar New Year celebrations when they were traditionally consumed as symbols of wealth and prosperity. The evolution of spring rolls continued through various Chinese dynasties. During the Tang Dynasty (618–907), these roles became more elaborate, with richer fillings indicating social status. By the Ming Dynasty (1368–1644), the dish had transformed into the cylindrical shape we recognize today, and it became a staple during spring festivals, symbolizing gold bars and good fortune. As Chinese immigrants traveled and settled in different countries, they brought spring rolls with them, leading to regional variations. In Vietnam, for example, they are known as gỏi cuốn, typically made with rice paper and filled with fresh ingredients like shrimp and herbs. Each culture has adapted the dish to incorporate local flavors and ingredients, resulting in a diverse array of spring roll styles across Asia.
Conclusion
Spring rolls are more than just a culinary delight; they represent a rich tapestry of cultural history and adaptation. From their origins in ancient China to their global popularity today, spring rolls have evolved while retaining their significance as symbols of wealth and prosperity during celebrations. Their versatility allows for endless variations, making them a beloved dish in many cuisines around the world. Whether enjoyed as a fried appetizer or fresh with vibrant fillings, spring rolls continue to connect people through shared culinary traditions and experiences.
Ingredients
For the Filling
- 1 tablespoon toasted sesame oil
- 2 teaspoons fresh ginger, minced
- 170 grams (6 oz) ground pork (or ground chicken/turkey)
- 1 small onion, shredded
- 125 grams (1 large) carrot, shredded
- 70 grams (1 rib) celery, shredded
- 70 grams (2-3 large) fresh shiitake mushrooms, sliced
- 280 grams (10 oz) napa cabbage, shredded
- 70 grams (2.5 oz) glass noodles, rehydrated and chopped
- 2 tablespoons oyster sauce
- 2 tablespoons Shaoxing wine (or dry sherry)
- 2 teaspoons potato starch (or cornstarch)
- 2 teaspoons soy sauce
- ½ teaspoon ground white pepper
- ¼ teaspoon salt
For the Spring Rolls
- 15 sheets of spring roll wrappers
- 3 tablespoons water (for sealing)
- 3 tablespoons flour (for sealing)
- Vegetable oil (for deep-frying)
Instructions
- Prepare the Filling:
- Heat the sesame oil in a large skillet or wok over medium heat. Add minced ginger and sauté for about 30 seconds until fragrant.
- Add the ground pork and cook until browned. Stir in the onion, carrot, celery, mushrooms, and napa cabbage. Cook for about 5–7 minutes until the vegetables are tender.
- Add the glass noodles, oyster sauce, Shaoxing wine, potato starch, soy sauce, white pepper, and salt. Mix well and cook for an additional 2–3 minutes. Remove from heat and let it cool.
- Prepare the Wrappers:
- In a small bowl, mix the water and flour to create a paste for sealing the rolls.
- Assemble the Spring Rolls:
- Lay a spring roll wrapper on a clean surface with one corner pointing towards you. Place about 2 tablespoons of filling near the bottom edge of the wrapper.
- Fold the bottom corner over the filling tightly. Then fold in the side corners and roll it up tightly to enclose the filling. Use a little of the flour-water paste to seal the edge of the wrapper.
- Repeat with remaining wrappers and filling.
- Fry the Spring Rolls:
- Heat vegetable oil in a deep frying pan or wok over medium-high heat. Once hot, carefully add spring rolls in batches, frying until golden brown and crispy on all sides (about 4–5 minutes).
- Remove with a slotted spoon and drain on paper towels.
- Serve:
- Enjoy your spring rolls hot with dipping sauces like sweet chili sauce or soy sauce.
This recipe yields delicious homemade spring rolls that are perfect as appetizers or snacks! Feel free to customize the filling with your favorite vegetables or proteins.
9. Sweet and Sour Pork Recipe
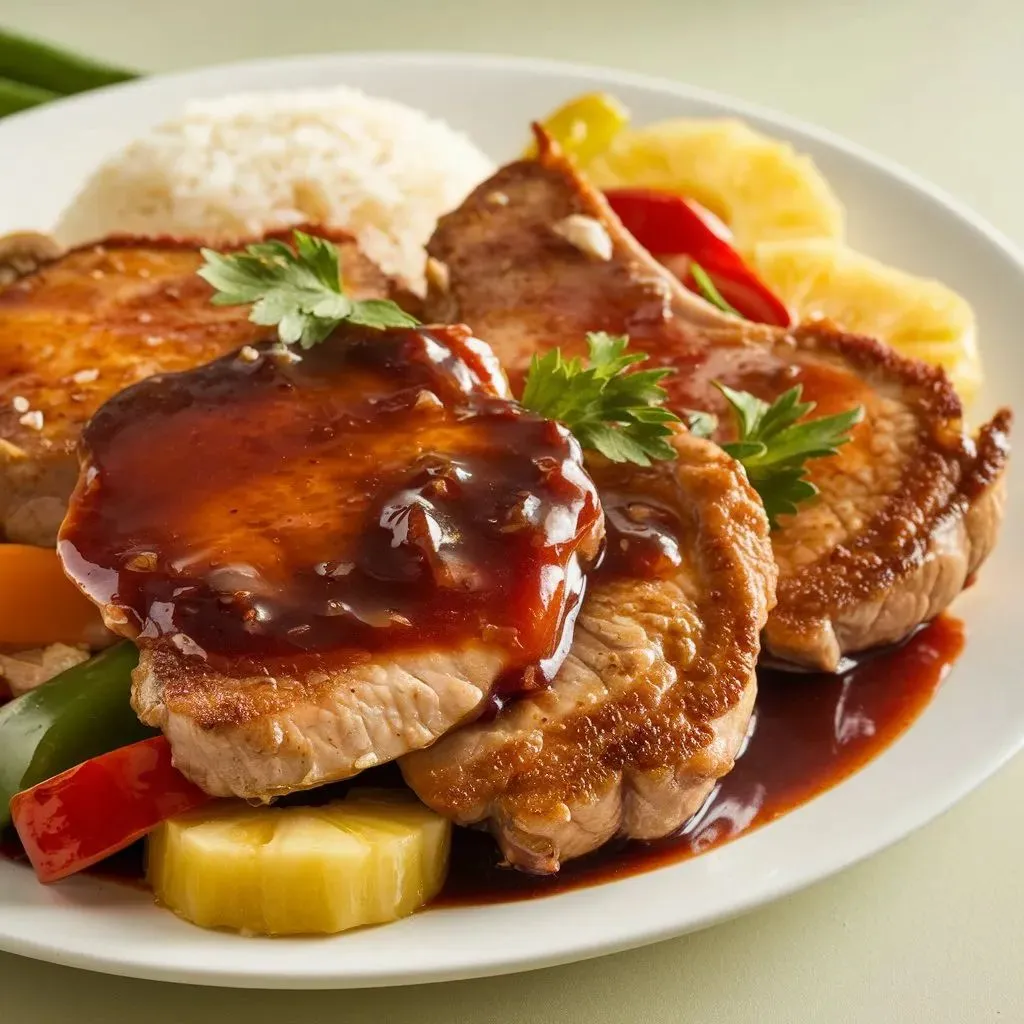
Origins and Etymology of Sweet and Sour Pork
Sweet and Sour Pork, known in Cantonese as 咕噜肉 (gū lū ròu), is a dish that has become emblematic of Chinese cuisine worldwide. Its origins are somewhat ambiguous, with multiple regions in China, including Canton, Henan, and Jiangsu, claiming to be the birthplace of this iconic dish. However, it is widely accepted that the most recognizable version of Sweet and Sour Pork comes from Cantonese cuisine, particularly from the Guangdong province, where it was developed in the 19th century. The dish traditionally features deep-fried pork chunks that are stir-fried with bell peppers, onions, and pineapple, all coated in a vibrant sweet and sour sauce. Early recipes utilized local ingredients such as hawthorn berries and preserved plums to create the sauce, which later evolved to include Western ingredients like ketchup and Worcestershire sauce, reflecting the influence of foreign trade and culinary exchange during the era of Western imperialism in China. The name “Sweet and Sour Pork” directly describes its flavor profile, while the Cantonese name gū lū ròu has various interpretations. Some legends suggest it was named to appeal to Western palates, with “gū lū” possibly derived from a derogatory term for foreigners (gwei lo), although this theory lacks substantial evidence.
Conclusion
Sweet and Sour Pork represents a fusion of culinary traditions and cultural exchanges that have shaped its development over time. From its roots in 18th-century Cantonese cuisine to its adaptation by Chinese immigrants in America during the Gold Rush, this dish has transcended borders to become a staple in both Chinese restaurants and Westernized Chinese cuisine. Its enduring popularity is a testament to its versatility and appeal, allowing it to maintain relevance across diverse culinary landscapes. Whether enjoyed in its traditional form or as a modified version catering to local tastes, Sweet and Sour Pork continues to be celebrated for its delightful balance of flavors and textures.
Ingredients
For the Pork
- 600g (1.3 lb) pork belly or pork shoulder, cut into 2.5 cm (1 inch) cubes
- 1 tablespoon light soy sauce
- 1 garlic clove, finely grated
- ½ teaspoon ground black pepper
- ⅓ cup plain flour (for coating)
- Vegetable oil (for deep frying)
For the Sweet and Sour Sauce
- ½ cup brown sugar
- 3 tablespoons white vinegar
- 2 tablespoons tomato ketchup
- 1 tablespoon light soy sauce
- ⅓ cup pineapple juice
- ¼ teaspoon Chinese five spice (optional)
- 2 teaspoons cornflour (cornstarch) mixed with 2 tablespoons water (for thickening)
For the Vegetables
- 1 brown onion, diced
- 1 bell pepper (capsicum), cut into chunks
- 100g (3.5 oz) fresh pineapple, diced
- 4 spring onions (scallions), trimmed and cut into batons
Instructions
- Marinate the Pork:
- In a large bowl, combine the pork, light soy sauce, grated garlic, and ground black pepper. Mix well and let it marinate for about 30 minutes.
- Prepare the Sweet and Sour Sauce:
- In a saucepan over medium-high heat, combine brown sugar, white vinegar, tomato ketchup, light soy sauce, pineapple juice, and Chinese five spice (if using). Bring to a simmer for about 5 minutes until the sugar dissolves.
- Mix the cornflour with water in a small bowl until smooth, then gradually add it to the sauce while stirring continuously until it thickens. Remove from heat and set aside.
- Cook the Pork:
- Heat vegetable oil in a deep frying pan or wok over high heat. Toss the marinated pork in plain flour to coat evenly.
- When the oil is hot (around 180°C or 350°F), carefully add the coated pork in batches. Fry for about 3–4 minutes or until golden brown and crispy. Drain on paper towels.
- Stir-Fry Vegetables:
- In a clean wok or large frying pan over high heat, add a little oil. Stir-fry the diced onion and bell pepper for about 1–2 minutes until they start to soften.
- Add the fried pork and diced pineapple to the pan along with the sweet and sour sauce. Toss everything together until well combined and heated through.
- Serve:
- Garnish with spring onions before serving. Enjoy your Sweet and Sour Pork hot with steamed rice.
This recipe captures the classic flavors of Sweet and Sour Pork while allowing for variations based on personal preferences!
10. Yangzhou Fried Rice Recipe
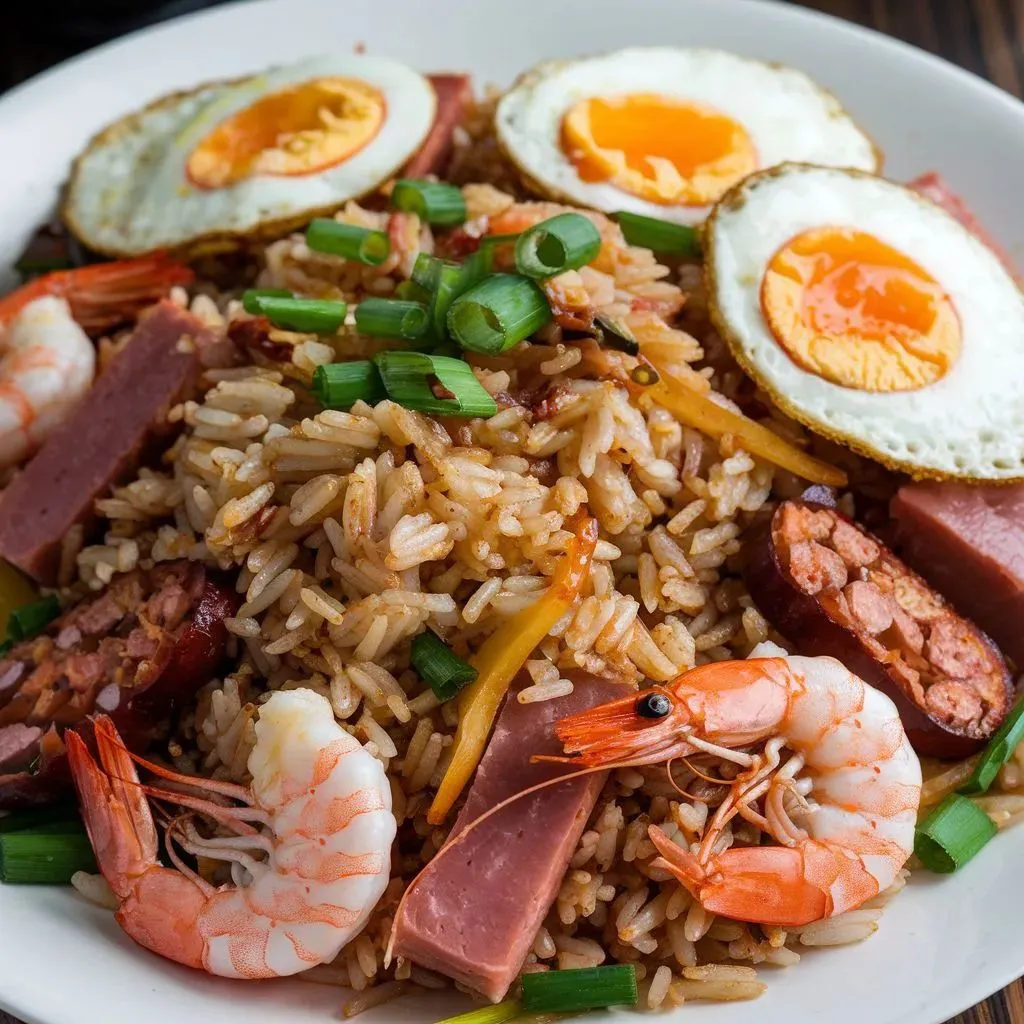
Origins and Etymology of Yangzhou Fried Rice
Yangzhou Fried Rice (扬州炒饭, Yángzhōu chǎofàn) is a renowned Chinese dish that originated from the city of Yangzhou, located in Jiangsu Province. The dish’s history can be traced back to the Qing Dynasty, particularly to the official Yi Bingshou (1754–1815), who is credited with popularizing it during his tenure as the regional magistrate of Yangzhou. Although the dish did not originate in Yangzhou, it was named after the city due to its association with the area’s rich culinary tradition and imperial-style cooking, which catered to visiting dignitaries and emperors. The name “Yangzhou Fried Rice” translates directly from its Chinese characters, where 扬州 refers to the city and 炒饭 means “fried rice.” The dish is also known by various names in different regions, including Yangchow Fried Rice and Yeung Chow Fried Rice, reflecting its Cantonese pronunciation and adaptations to Western Chinese cuisine. Historically, it was referred to as “three fragrances shattered gold rice” (三香碎金饭), highlighting its three main ingredients: rice, eggs, and scallions.
Conclusion
Yangzhou Fried Rice stands as a testament to the culinary heritage of Yangzhou, showcasing a blend of flavors and textures that have evolved over centuries. Its development from a humble dish into a celebrated staple reflects the region’s emphasis on technique and quality ingredients. Today, Yangzhou Fried Rice is enjoyed globally, often featuring a variety of proteins such as shrimp, pork, and chicken, along with vegetables and eggs, making it a versatile dish that appeals to diverse palates. The dish not only embodies the essence of Chinese fried rice but also serves as a cultural symbol of Yangzhou’s historical significance in Chinese gastronomy.
Ingredients
- For the Fried Rice:
- 4 cups cold leftover white rice (preferably day-old)
- 2 tablespoons vegetable oil
- 2 large eggs, lightly beaten
- 4 oz (110 g) char siu (Chinese BBQ pork), diced
- 6 oz (170 g) shrimp, peeled and deveined
- 1/2 cup frozen peas
- 1/2 cup diced carrots
- 1/4 cup bamboo shoots, diced (optional)
- 4 green onions, chopped (white and green parts separated)
- For the Sauce:
- 1 tablespoon light soy sauce
- 1 tablespoon oyster sauce
- Salt and white pepper to taste
Instructions
- Prepare the Ingredients:
- Ensure all ingredients are prepped and ready to go, as stir-frying is a quick process.
- Cook the Eggs:
- Heat 1 tablespoon of vegetable oil in a wok or large frying pan over medium-high heat. Add the beaten eggs and scramble until just set. Remove the eggs from the pan and set aside.
- Stir-Fry the Proteins:
- In the same pan, add another tablespoon of oil. Add the diced char siu and shrimp. Stir-fry for about 2–3 minutes until the shrimp turns pink and is cooked through.
- Add Vegetables:
- Add the diced carrots, bamboo shoots (if using), and frozen peas to the pan. Stir-fry for another 2 minutes until the vegetables are tender.
- Combine with Rice:
- Add the cold leftover rice to the pan, breaking up any clumps. Stir well to combine all ingredients.
- Seasoning:
- Pour in the light soy sauce and oyster sauce. Season with salt and white pepper to taste. Stir-fry everything together for about 3–5 minutes until heated through and well mixed.
- Finish with Eggs and Green Onions:
- Finally, add the scrambled eggs back into the pan along with the chopped green onions (white parts). Toss everything together for an additional minute before serving.
- Serve:
- Serve hot, garnished with the green parts of the green onions if desired.
This Yangzhou Fried Rice recipe captures the essence of this classic dish with its mix of proteins, vibrant vegetables, and flavorful sauces, making it a perfect meal for any occasion! Enjoy!